My browser OCR couldn’t read a sunscreen bottle. Here’s what fixed it.
Screenshots worked fine. Then someone pointed a phone at a bottle of sunscreen, and my image-to-text tool spat out “EB ewraone”. This is what was going wrong and what I changed.
I run devpack, a site with 500+ free tools that work in the browser. One of them is an image to text tool. It uses Tesseract.js, which is the Tesseract OCR engine compiled to WebAssembly, so the image never leaves your device. I liked that a lot, and for screenshots and scanned pages it worked really well. Most of my tests came back at 94 to 96% confidence.
Then I tried it the way people actually use their phones. I took a photo of a kids’ sunscreen bottle. Blue plastic, white letters, a big yellow sun with “SPF 50” in it. This is what came back:
| FA Be NO
k Jody ; "
| Diana
i Collection
Kid i
“protect & care
v4 oR. a
7 SPF
...
EB ewraone
A few real words in there, buried in junk. A second photo, a baby cologne bottle, was worse. It came back as seven short lines. One of them was just an ampersand, and another was “& TED”.
It turned out there wasn’t one problem. There were four, and they stacked on top of each other.
Problem 1: the engine was reading the photo sideways
This one took me longer to see than I’d like to admit, because on my screen the photo looked perfectly fine.
Phone cameras often don’t rotate the actual pixels when you hold the phone upright. They save the image the way the sensor sees it and add a small piece of metadata, the EXIF orientation tag, that says “turn this 90° when you show it”. Your gallery app obeys the tag. Browsers obey it too when they display an <img>. But I was handing the raw File straight to Tesseract, and Tesseract just reads the pixels.
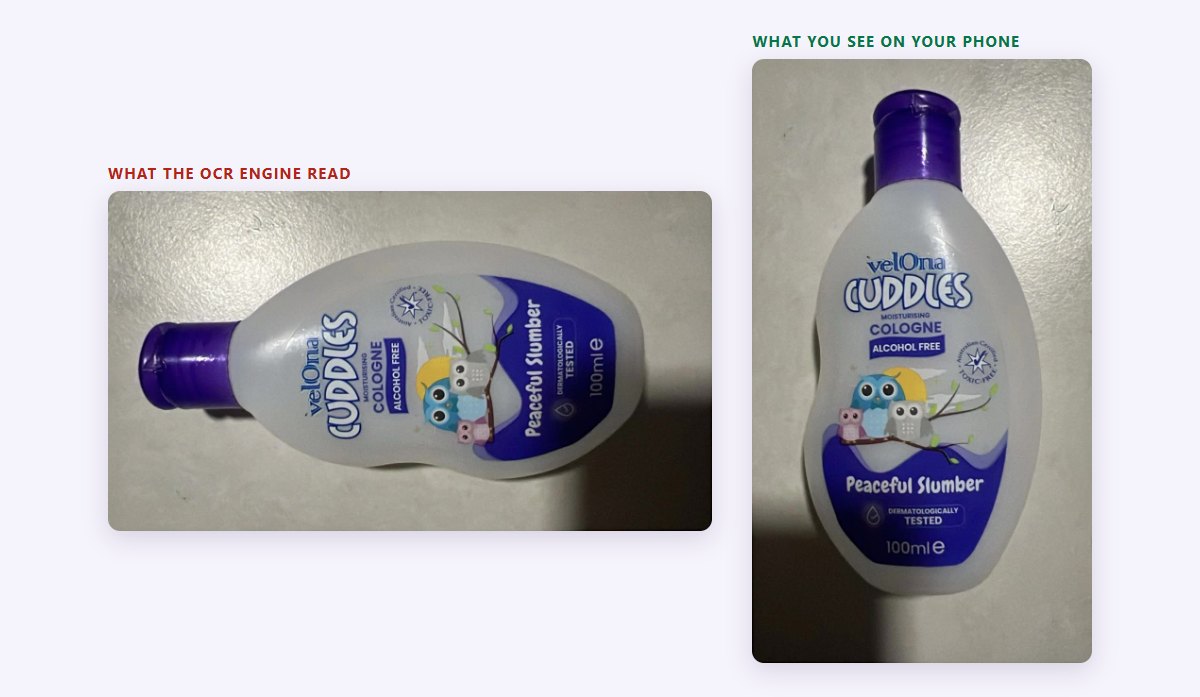
So the engine was trying to read text that was lying on its side. No wonder it found “ING” and an ampersand.
The fix is small. Decode the file with createImageBitmap and ask for the orientation to be applied, then draw it on a canvas and use that canvas for everything afterwards:
async function uprightCanvas(file) {
  const bmp = await createImageBitmap(file, { imageOrientation: 'from-image' });
  const c = document.createElement('canvas');
  c.width = bmp.width;
  c.height = bmp.height;
  c.getContext('2d').drawImage(bmp, 0, 0);
  bmp.close();
  return c;
}
I also use this same canvas for the preview thumbnail now. Before, the tool showed you nothing at all, so you couldn’t even tell what it was looking at. Now you see exactly what the OCR sees, and if it’s wrong there’s a rotate button.
One more case: some photos really are sideways, with no tag at all. Screenshots of a rotated photo, or images that went through an app that stripped the metadata. For those, if the first read comes back with low confidence, the tool reads a small copy (about 1000 px) at 0°, 90°, 180° and 270°, scores each one, and turns the image if one direction is clearly better. The build of Tesseract.js I use only has the LSTM engine, so its own orientation detection isn’t available. Four quick passes on a small copy did the job instead.
Problem 2: white text on a colored background
With the rotation fixed, the cologne bottle got better, but the sunscreen was still rough. Look at the label again. Most of the important words, like “UVA / UVB PROTECTION” and “NET WT 200 ml”, are white or light blue on dark blue.
Tesseract is trained mostly on dark text on light paper. It handles some inverted text, but on a photo with mixed colors, reflections and a curved surface, it mostly gives up.
So I make two extra copies of the image. The first one is plain grayscale with a contrast stretch: I build a histogram, throw away the darkest and brightest 1% of pixels, and spread the rest over the full 0 to 255 range. The second copy is the same thing, inverted. White-on-blue becomes black-on-white.
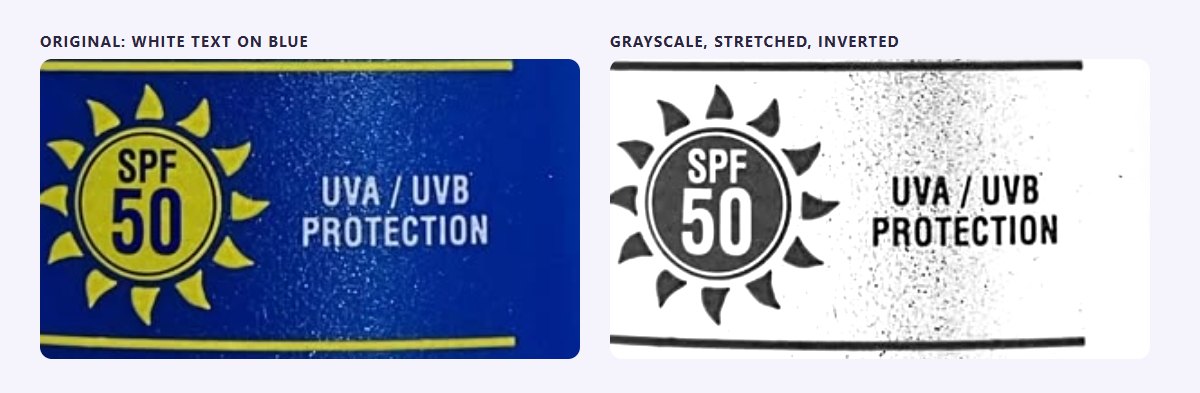
The code is not fancy:
// a: ImageData pixels, already grayscale; lo/hi: the 1% and 99% points
for (let i = 0; i < a.length; i += 4) {
  let g = (a[i] - lo) * 255 / (hi - lo);
  g = Math.max(0, Math.min(255, g));
  if (invert) g = 255 - g;
  a[i] = a[i + 1] = a[i + 2] = g;
}
I also switch Tesseract to page segmentation mode 11 (“sparse text”) for these passes. The default mode 3 expects a page with paragraphs and columns. A product label is more like a handful of words scattered around a picture, and mode 11 is built for exactly that.
Problem 3: no single pass gets everything
This was the part I didn’t expect. I assumed one of the variants would just win. It doesn’t work like that.
On the sunscreen bottle, the normal pass found “Diana” and “Collection”. The inverted pass found “UVA UVB PROTECTION” and “NET WT 200 ml”. The original color image, read as a document, was the only one that caught “Water Resistant” on one of my test runs. Every pass also added its own garbage: “Ag”, “as”, “©DDL”, “CJC)”. That’s the sun and the cartoon kid getting read as letters.
So instead of picking one result, I merge them word by word. Tesseract gives you every word with a bounding box and a confidence score, which makes this possible:
- Collect the words from all passes.
- Throw out the obvious junk. Words of three or more characters need at least 60% confidence. One and two character fragments need 88%, because that’s where most of the noise lives. Anything with stray symbols like © or an unmatched bracket goes too.
- If two passes read the same word in the same spot, give it a confidence boost. Two readings agreeing is a much better signal than one reading being sure of itself. This is what saved “Slumber” on the cologne bottle, which came in at 79% in one pass and 54% in another.
- Where boxes overlap, keep the better word. At first I picked the most confident one, and the result was “Pea” instead of “Peaceful”, because the short fragment happened to score higher. Now the score favors whole words a bit: confidence times the square root of the length.
- Rebuild the lines by grouping words whose vertical centers are close, then sort each line left to right.
Small print got its own fix: on images that aren’t already large, I run the grayscale and inverted passes again on a copy scaled up 1.6×. That’s where “MOISTURISING” and “ALCOHOL FREE” on the cologne bottle finally showed up.
What it reads now
Here’s the sunscreen bottle after all of this, at 92% average confidence:
Diana
Collection
Kid
protect & care
UVA UVB
PROTECTION
face & body
sunblock lotion
NET WT 200 ml
Compare that with the first output. Every line of plain printed text on that label is there.
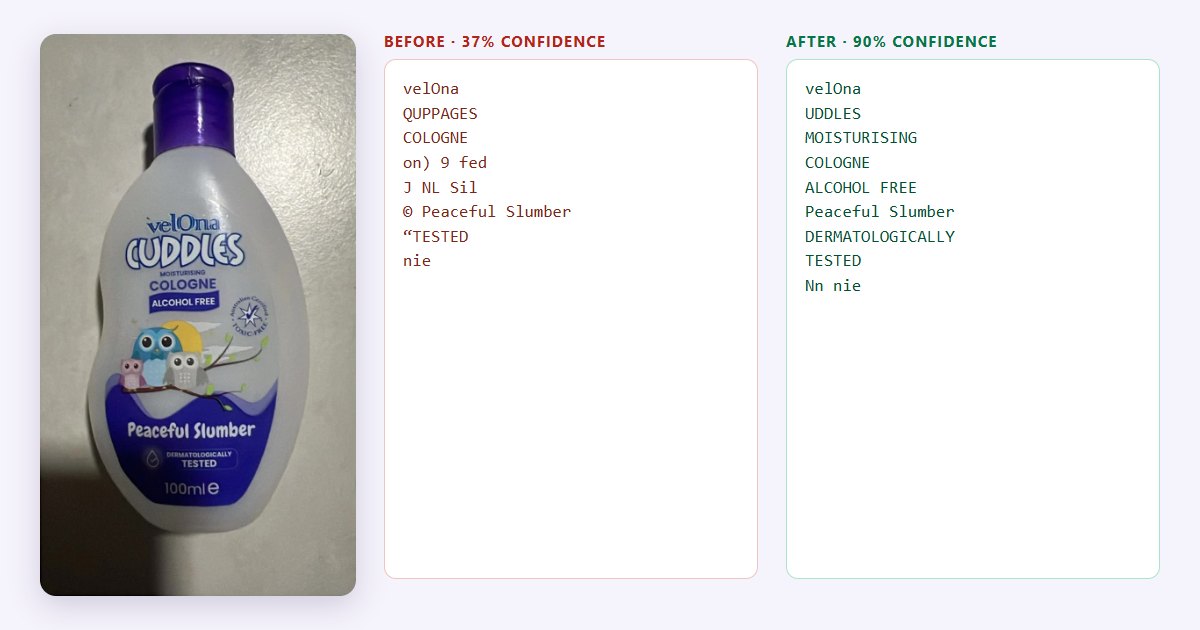
The cologne bottle is the one on the cover. I retook it on a table, in plain light, and ran both versions on the same photo. The old single pass got 37% confidence and gave me “QUPPAGES”, “on) 9 fed” and “J NL Sil”. The new version gets 90%:
velOna
UDDLES
MOISTURISING
COLOGNE
ALCOHOL FREE
Peaceful Slumber
DERMATOLOGICALLY
TESTED
Nn nie
Not perfect. “Nn nie” is the little drop icon and the edge of the label, and the bubble letters still lose their first C. But every line you’d actually want to copy is there.
The important thing for me was not breaking what already worked. Screenshots and scans go through the first, normal pass and come back with high confidence, so the extra passes never run. A receipt still reads at 94% and a notes screenshot at 95%, at the same speed as before. The photo mode only kicks in when that first pass is unsure, and it adds about two or three seconds on my laptop.
Bonus: guessing the language
Tesseract needs to know the language up front, and most people never touch the dropdown. So the tool now has an “Auto-detect” option, and it’s the default on the English site.
The trick is simple. It reads the image in English first. English models still read Spanish, French or German letters reasonably well, just without the accents. Then I strip the accents from the result and count common short words for each language: “the”, “and” and “of” for English, “el”, “la” and “que” for Spanish, “der”, “die” and “und” for German, and so on. If another language clearly wins, the tool downloads that language’s data and reads the image again. A Spanish test note came back at 96% with “reunión” and “mañana” spelled correctly.
This doesn’t work for other scripts. You can’t tell Russian from Hindi by reading them with an English model, because you just get nonsense. For those, the tool looks at the languages set in your browser, and if one of them uses another script and the English result is weak, it tries that language.
What still doesn’t work
I want to be honest about this part. The cologne bottle says “CUDDLES” in big bubble letters, and the best the tool manages is “UDDLES”. The “Lady” in script on the sunscreen doesn’t come through at all, and neither does handwriting. These are limits of the engine, and the fix would be a much bigger model. That means tens of megabytes to download, or sending the photo to a server, and the whole point of this tool is that your images stay on your device.
For printed text on real-world photos, though, it went from mostly unusable to pretty good.
If you’re building something similar
- Always apply EXIF orientation before you process a photo.
createImageBitmap(file, { imageOrientation: 'from-image' })does it in one line. - Show the user the image you’re actually processing. A preview would have shown me the sideways problem in five seconds.
- Read light-on-dark text from an inverted copy. Don’t trust the engine to handle it.
- Merge several passes instead of choosing one. Word boxes and confidence scores make it straightforward, and agreement between passes is a great signal.
- Only pay for the extra work when you need it. A confident first pass means you can skip everything else.
If you want to try it, the Image to Text tool is free and runs entirely in your browser. On a phone there’s a “Take a photo” button. I’d genuinely like to see the photos it still gets wrong.